Japanese woodblock printing, known as ukiyo-e, emerged during the Edo period in Japan (17th-19th centuries) and has since left an indelible mark on art history. Ukiyo-e, which translates to “pictures of the floating world,” captured the essence of daily life, landscapes, kabuki actors, beautiful women (bijin-ga), and mythical beings. This art form not only reflected the cultural and social milieu of Japan at the time but also significantly influenced Western art movements such as Impressionism and Post-Impressionism.
The key innovation of ukiyo-e was the collaborative process involving an artist, a woodblock carver, and a printer, which allowed for mass production of prints. This democratization of art made it accessible to a broader audience, including the urban commoners of Edo (modern-day Tokyo). Ukiyo-e prints were affordable and served as both entertainment and cultural artifacts.
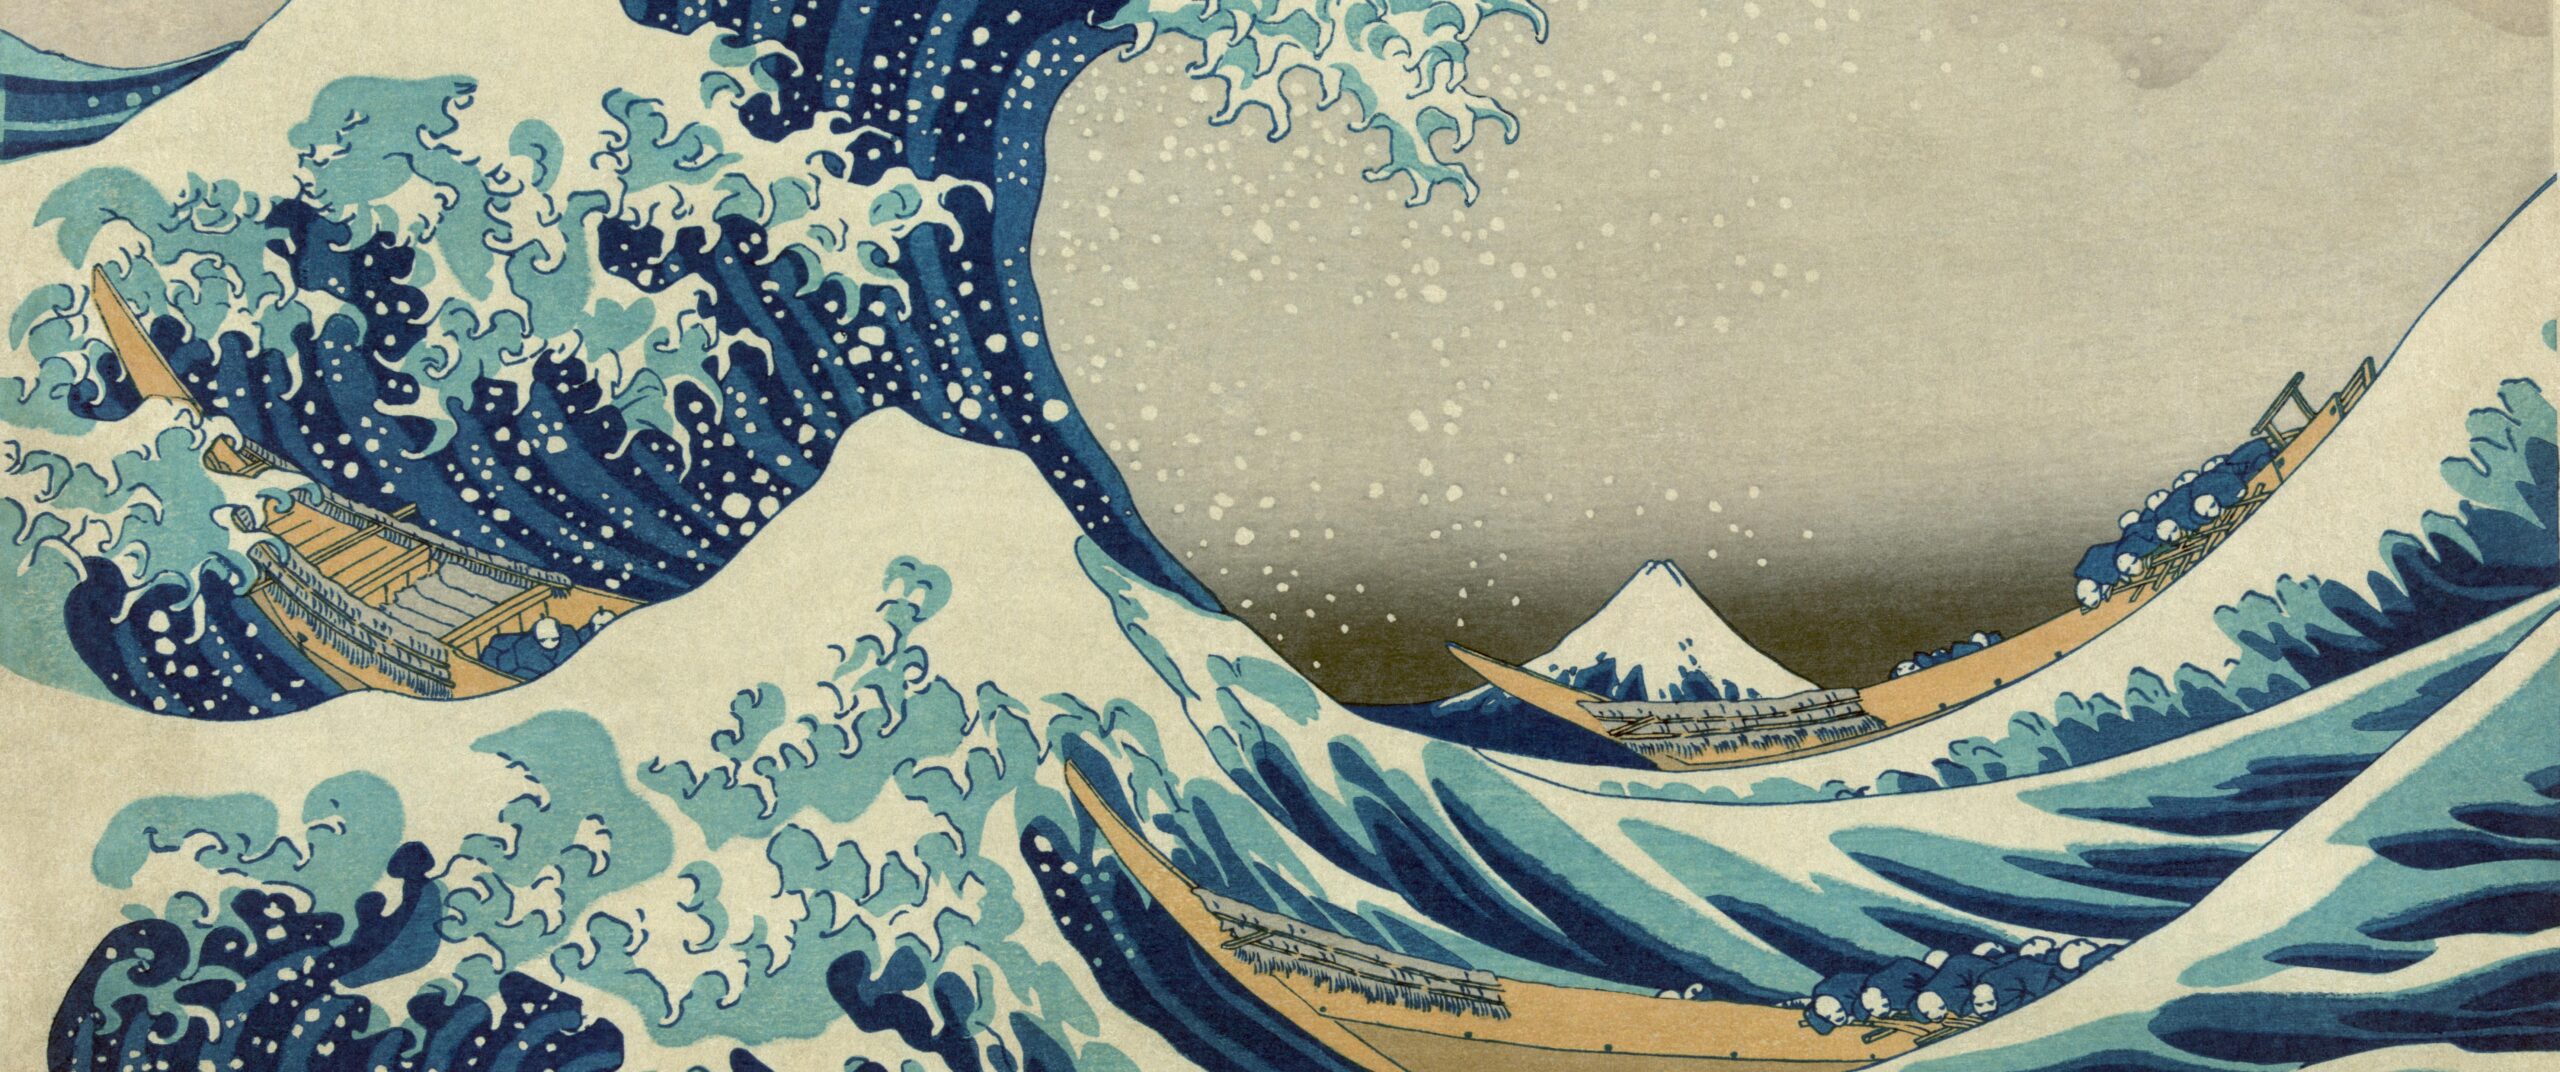
Artists like Katsushika Hokusai and Utagawa Hiroshige are renowned for their iconic ukiyo-e works, such as Hokusai’s “The Great Wave off Kanagawa” and Hiroshige’s “Fifty-three Stations of the Tōkaidō.” These prints exemplify the meticulous craftsmanship and artistic vision that defined the ukiyo-e style.
Find Japanese woodblock stamps on Shoply Japan!
In the context of art history, Japanese woodblock printing introduced novel techniques like the use of bold outlines, flat areas of color, and unusual perspectives, challenging traditional European artistic conventions. The allure of ukiyo-e continues to captivate contemporary artists and enthusiasts alike, emphasizing the enduring legacy of this unique form of printmaking. This blog post aims to delve deeper into the history and technique of ukiyo-e, inviting readers to appreciate and explore this captivating art form.
History of Ukiyo-e Printmaking
Ukiyo-e, meaning “pictures of the floating world,” originated during the Edo period (1603-1868) in Japan, particularly flourishing in urban centers like Edo (present-day Tokyo) and Kyoto. This period marked a time of peace and prosperity, allowing for the growth of a merchant class with increased leisure time and disposable income, which in turn fueled the demand for affordable art.
The techniques of ukiyo-e evolved significantly during this time. Initially influenced by Chinese woodblock printing, Japanese artists adapted and refined the process to suit their own aesthetic preferences. The collaborative nature of ukiyo-e involved artists, woodblock carvers, and printers working together to produce vivid, colorful prints.
Two prominent figures in ukiyo-e history are Katsushika Hokusai (1760-1849) and Utagawa Hiroshige (1797-1858). Hokusai, famous for his series “Thirty-six Views of Mount Fuji” and “One Hundred Views of Mount Fuji,” pushed artistic boundaries with his dynamic compositions and expressive use of line. Hiroshige, known for his landscape prints, captured the beauty of nature and everyday life, especially in his series “Fifty-three Stations of the Tōkaidō” and “One Hundred Famous Views of Edo.”
Ukiyo-e prints depicted a wide range of subjects reflecting the urban culture of the time. Popular themes included landscapes, kabuki actors, courtesans, sumo wrestlers, flora and fauna, and scenes of everyday life. These prints not only entertained but also served as a window into the social trends and aesthetics of Edo-period Japan, influencing subsequent generations of artists both in Japan and the West.
The Woodblock Printing Process
The woodblock printing process in ukiyo-e involves a series of meticulous steps that culminate in the creation of vibrant and detailed prints. Here’s an overview of this traditional process:
Design: The process begins with the artist’s design, which is typically drawn on paper. This design serves as the blueprint for the woodblock carving.
Carving the Blocks: Once the design is finalized, it is transferred onto multiple woodblocks, each representing a different color in the final print. Skilled artisans meticulously carve away the negative spaces of the design using sharp tools, leaving raised areas that will hold ink.
Selection of Materials: Key materials in woodblock printing include:
– Woodblocks: Usually made of cherry wood or other hardwoods, providing a sturdy surface for carving.
– Carving Tools: Various gouges, knives, and chisels are used to carve intricate details into the woodblocks.
– Paper: Thin, absorbent papers like washi are traditionally used for printing ukiyo-e.
– Ink: Water-based or oil-based pigments are applied to the woodblocks for printing.
Printing Process:
a. Inking: Ink is applied to the carved woodblocks using brushes or rollers. Each block is inked with a different color.
b. Printing: The paper is carefully aligned and pressed onto each inked woodblock using a baren (a round pad) or a printing press.
c. Color Layering: Multiple layers of color are applied by repeating the inking and printing process with different woodblocks.
Final Print: After all the colors have been applied, a complete and vibrant print emerges. The registration of colors and precision in printing require skill and attention to detail.
This process exemplifies the meticulous craftsmanship and collaborative effort involved in traditional ukiyo-e printmaking, resulting in captivating artworks that have stood the test of time.
Materials Needed
Woodblock printing requires a specific set of tools and materials to achieve successful prints. Here’s a comprehensive list of what you’ll need:
a. Woodblocks: Choose hardwood blocks such as cherry or maple, sized appropriately for your design. Blocks are typically smooth and flat to ensure even ink distribution.
b. Carving Tools: Essential tools include:
– Gouges: Used for clearing large areas of wood and creating curved lines.
– Knives: Sharp knives for detailed carving and fine lines.
– Chisels: To clean up edges and achieve precise cuts.
c. Printing Supplies:
– Brushes: Soft brushes for applying ink to the woodblocks.
– Baren: A hand-held tool with a flat, smooth bottom used to press paper onto the inked woodblocks. Alternatively, a printing press can be used for larger-scale production.
– Ink: Water-based or oil-based ink suitable for woodblock printing. Choose colors that complement your design.
d. Paper: Select thin, absorbent papers like washi or mulberry paper, which are traditional choices for ukiyo-e prints. These papers allow for crisp ink transfer and can withstand multiple layers of printing without tearing.
Additional Materials:
– Registration System: For precise alignment of multiple woodblocks.
– Tracing Paper: Used for transferring designs onto woodblocks.
– Palette: To mix and customize ink colors.
– Cleaning Supplies: Rags, solvents (if using oil-based ink), and maintenance tools for woodblock carving.
Having the right tools and materials is crucial for achieving quality woodblock prints. Experimenting with different combinations of materials can lead to unique artistic outcomes and a deeper understanding of this traditional printmaking process. Adjustments and adaptations can be made based on personal preferences and desired artistic effects.
Designing Your Print
Designing a print for woodblock printing requires careful consideration of the medium’s unique characteristics. Here are some tips to create a design that is well-suited for woodblock printing:
a. Simplicity and Clarity: Opt for bold, simple designs with clear shapes and defined outlines. Intricate details can be challenging to carve and may not translate well onto the woodblock. Focus on capturing essential elements and minimizing unnecessary complexity.
b. Strong Composition: Pay attention to the arrangement of elements within your design. Use principles of balance, contrast, and focal points to create visual interest. Consider how different parts of your composition will be divided across multiple woodblocks if using multiple colors.
c. Limited Color Palette: Plan your color scheme thoughtfully. Keep in mind that each color requires a separate woodblock and printing pass. Start with a limited palette of primary colors and gradually introduce more colors as you gain experience.
d. Consider Negative Space: Utilize negative space effectively to enhance the overall composition. Negative space can help define shapes and create contrast within the design.
e. Test Your Design: Before committing to carving the woodblocks, create a preliminary sketch or digital mock-up of your design. This allows you to visualize how the design will translate into a woodblock print and make necessary adjustments.
f. Simplify for Carving: When designing, think about how each element will be carved into the woodblock. Avoid intricate details that may be challenging to carve or prone to breaking during the printing process. Focus on creating distinct shapes and areas of color.
Shop for Ukiyo-e books on Shoply Japan!
By following these guidelines, you can create a design that not only showcases your artistic vision but also leverages the strengths of woodblock printing. Experimentation and iteration are key to refining your designs and achieving successful prints that capture the essence of this traditional printmaking technique.
Carving the Woodblock
Carving a woodblock for printmaking is a precise and intricate process that requires patience and attention to detail. Here’s a step-by-step tutorial along with safety tips and techniques:
Step 1: Transfer the Design
– Start by transferring your finalized design onto the woodblock using tracing paper and carbon paper. Ensure the design is accurately aligned and firmly transferred onto the block.
Step 2: Secure the Woodblock
– Secure the woodblock onto a stable surface such as a workbench using clamps or a vice. This will prevent the block from moving during carving.
Step 3: Carving Tools
– Select the appropriate carving tools based on the intricacy of your design. Use gouges for removing larger areas of wood and knives for finer details. Keep your tools sharp for precise cuts.
Step 4: Begin Carving
– Start carving by outlining the major shapes and elements of your design. Work slowly and carefully, cutting away small sections of wood at a time. Use a combination of gouges and knives to achieve different textures and depths.
Step 5: Safety Tips
– Wear protective gear such as safety goggles and gloves to prevent injuries from flying wood chips and sharp tools.
– Always carve away from your body and maintain a firm grip on the carving tools.
– Take breaks frequently to rest your hands and avoid fatigue, which can affect your precision.
Step 6: Achieving Textures and Details
– Experiment with different carving techniques to create textures like cross-hatching, stippling, or gouging. Varying the depth and direction of cuts can add visual interest to your design.
– Practice on scrap wood to refine your carving skills before working on the final woodblock.
Step 7: Finishing
– Once the carving is complete, carefully inspect the woodblock for any rough edges or imperfections. Sand the surface lightly to ensure smooth ink transfer during printing.
By following these steps and safety guidelines, you can successfully carve a woodblock for printmaking, ready to be inked and printed onto paper. Remember that woodblock carving is a skill that improves with practice, so don’t hesitate to experiment and refine your techniques to achieve the desired results in your prints.
Inking and Printing
Inking and printing are critical steps in the woodblock printing process that require careful attention to achieve high-quality prints. Here’s a detailed guide on how to ink and print your woodblock:
Preparing and Applying Ink:
– Begin by placing a small amount of ink on a glass or metal palette. Use a brush or roller to spread the ink evenly until you achieve a smooth consistency.
– Carefully apply the ink to the carved woodblock, ensuring that all raised areas are covered with a thin, even layer of ink. Avoid over-inking, as excessive ink can lead to blurred details and smudges in the final print.
Printing Process:
– Place a sheet of paper on top of the inked woodblock, ensuring it is aligned correctly with the design.
– Use a baren, a round pad made of bamboo or plastic, to apply pressure evenly across the back of the paper. Start from the center and work outward in circular motions to transfer the ink from the woodblock to the paper.
– Peel back the paper carefully to reveal the printed image. Repeat the process for each color layer if creating a multi-color print, allowing sufficient drying time between each layer.
Troubleshooting Common Issues:
– Uneven Ink Distribution: Ensure the ink is applied evenly to the woodblock surface. Use a clean brush or roller to distribute the ink smoothly.
– **Smudging or Blurred Details**: Use less ink and apply gentle pressure when printing to avoid smudging. Ensure the woodblock is clean and free of excess ink.
– Paper Slippage: Secure the paper firmly in place during printing to prevent shifting or slippage.
After printing, allow the prints to dry completely before handling or further processing. Evaluate each print for quality and make adjustments to your technique as needed to achieve consistent and satisfactory results. With practice and attention to detail, you’ll master the art of inking and printing woodblock prints effectively.
Advanced Techniques and Tips
Exploring advanced techniques in woodblock printing allows artists to create intricate and visually captivating prints. Here are some tips and techniques to enhance your woodblock printing skills:
Shading and Color Variations:
– Achieve shading and color gradients by carefully controlling ink application. Use brushes or soft tools to blend different shades of ink directly on the woodblock before printing.
– Experiment with “bokashi,” a technique where ink is applied unevenly to create subtle transitions in color, adding depth and dimension to your prints.
Layering Multiple Blocks:
– For complex prints with multiple colors and details, employ a technique called “nishiki-e,” which involves using separate woodblocks for each color layer. Plan your design carefully to ensure precise registration of colors and layers.
– Start with lighter colors and gradually build up darker shades to avoid overprinting and muddying of colors.
Incorporating Traditional Japanese Aesthetics:
– Embrace the principles of wabi-sabi, focusing on simplicity, imperfection, and the beauty of natural materials. Use unrefined textures and muted colors to evoke a sense of rustic elegance in your prints.
– Explore themes of nature, seasons, and fleeting moments, which are central to traditional Japanese art and culture.
Experimentation and Adaptation:
– Don’t be afraid to experiment with unconventional materials or techniques to achieve unique effects in your prints.
– Study the works of master ukiyo-e artists and adapt their techniques to suit your artistic style and vision.
By incorporating these advanced techniques and embracing traditional Japanese aesthetics, you can elevate your woodblock prints to new artistic heights. Remember that mastery comes with practice and experimentation, so keep refining your skills and pushing the boundaries of this time-honored printmaking technique. Each print is an opportunity to explore creativity and express your unique artistic voice within the rich tradition of ukiyo-e.
Ukiyo-e holds a profound significance in the realm of art history, showcasing the convergence of artistic expression, craftsmanship, and cultural storytelling. Originating during the vibrant Edo period of Japan, ukiyo-e prints reflected the aspirations and daily life of urban dwellers, portraying a world of beauty, theater, nature, and nostalgia. These prints were not only visually captivating but also accessible to a wide audience, transcending social classes and leaving an indelible mark on global art movements.
The enduring appeal of ukiyo-e lies in its timeless aesthetics and technical ingenuity. The striking compositions, bold use of color, and mastery of printmaking techniques continue to inspire artists and enthusiasts worldwide. By delving into woodblock printing, individuals can experience the tactile process of creating art with their hands, fostering a deeper connection to artistic traditions and cultural heritage.
Readers are encouraged to embark on their own woodblock printing journey as a fulfilling creative endeavor. Whether individuals are seasoned artists or curious beginners, exploring this traditional technique offers a unique opportunity to hone skills, experiment with design, and appreciate the meditative process of carving and printing.
The community invites participants to share their experiences and creations. Embracing the challenges and joys of woodblock printing allows enthusiasts to celebrate the beauty of handmade art. Together, let’s continue the legacy of ukiyo-e by preserving its techniques, reinterpreting its themes, and fostering a vibrant community of artists passionate about this captivating art form. Join in celebrating the spirit of ukiyo-e and the boundless possibilities of woodblock printing!